
UK DIY Bathroom Pipe Boxing: Moisture Proof Materials & Access
Practical UK DIY guide to boxing bathroom pipes using moisture proof boards and removable access panels. Materials can be under £100; tiled or trades jobs...
UK DIY Bathroom Pipe Boxing: Moisture Proof Materials & Access
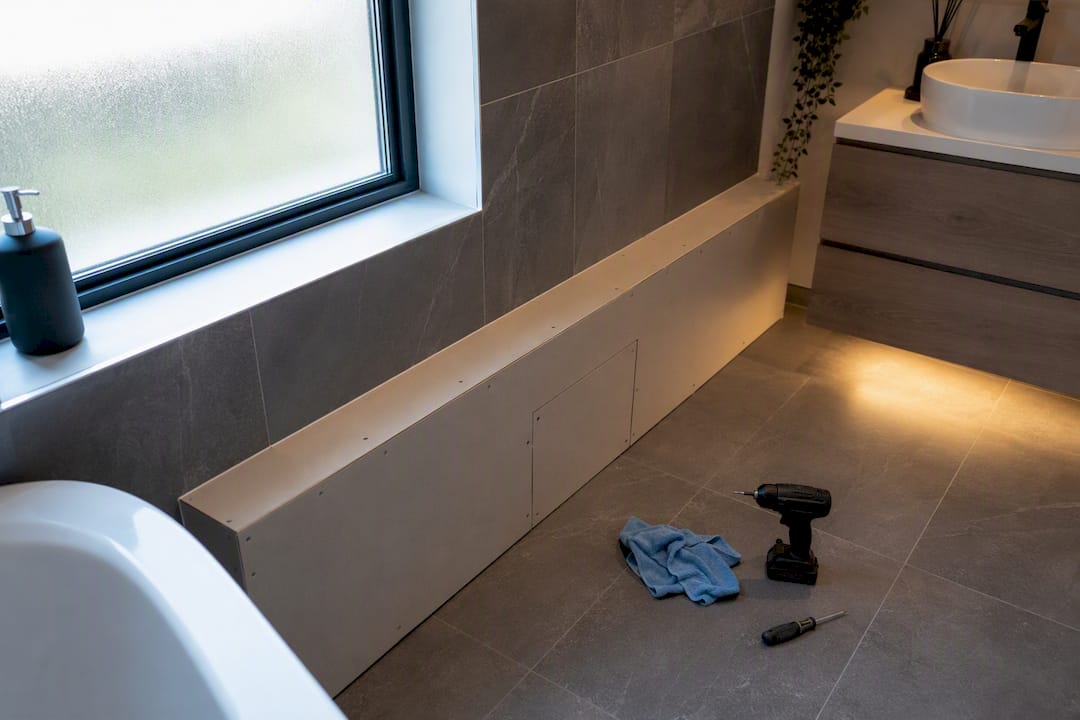
Yes, boxing in bathroom pipework is safe and worth doing, provided you use moisture-resistant materials, build in a way to reach the pipes later, and sort out any loose or noisy pipework before you seal anything up. Check for leaks and secure any rattling pipes first, then choose a moisture-rated board and plan an access panel into the design. Boxing hides the mess. It won’t fix a leak, a hammering pipe, or a corroded joint underneath.
TL;DR:
- Moisture-resistant MDF or cement boards are essential for ensuring long-lasting pipe boxing in wet zones, especially when tiling.
- Always leave at least 10 to 20mm of clearance around pipes and install removable panels for easy future access.
- Seal every panel edge with silicone to prevent water ingress and avoid warping or mold growth.
- Fix loose pipes with proper clips before boxing to prevent water hammer and acoustic issues, as boxing alone does not solve these problems.
- DIY costs can start below £100 for basic painted boxes, but tiling and professional work commonly range from £200 to over £500.
Table of Contents
- What You Need Before You Start Boxing In Pipes
- Step-by-Step: Framing and Fitting Your Pipe Boxing
- Which Boxing Material Is Right for Your Bathroom?
- Access and Maintenance: Don’t Box Yourself Into a Corner
- Safety, Moisture, and the Water Hammer Problem Boxing Won’t Fix
- What Does It Cost to Box in Bathroom Pipes?
- Finishing Touches That Make Boxing Look Built-In
- When to DIY and When to Call a Plumber
- Let JM Plumbing Services Handle Your Pipe Boxing and Bathroom Finish
- Key Manufacturer and Trade Resources
- Sources
- FAQ
What You Need Before You Start Boxing In Pipes
Get your materials and tools sorted before you cut a single piece of board. Trips back to the shop mid-job are how a Saturday afternoon turns into a Saturday, Sunday, and most of the following week.
For the boxing itself, moisture-resistant (MR) MDF, plywood, cement board like Marmox, and PVC panels are the four realistic choices, and thickness matters more than most guides admit. Toolstation’s guidance suggests 9mm boards for slim pipe runs and up to 18mm where you need the extra rigidity to support tiling.
You’ll also need:
- A drill/driver, a circular saw or jigsaw for panel cuts, and a spirit level for straight framing
- Corrosion-resistant screws (standard steel screws will rust in a bathroom void)
- Wall plugs for masonry walls, plus sanitary-grade silicone for edge sealing
- Tile adhesive and grout if you’re finishing in tile rather than paint
Isolate the water supply before you touch anything, and if there’s electrical work nearby (an extractor fan cable, a shaver socket), treat it as live until you’ve confirmed otherwise. Wear eye protection when cutting boards, and gloves when handling cut MDF edges, which are surprisingly sharp.
Pro Tip: Buy 10 to 15 percent more board than your measurements suggest. Bathroom walls are rarely square, and having an offcut on hand saves a return trip when your first panel doesn’t quite fit.
Step-by-Step: Framing and Fitting Your Pipe Boxing
Building a pipe box in a bathroom follows the same logic whether you’re covering a horizontal run under a basin or a vertical stack beside a toilet. Get the frame right and the panels go on in an afternoon.
- Measure with clearance. Allow 10 to 20mm of clear space around every pipe, valve, and joint. Never box in a valve or a joint tightly. You’ll need to reach it again someday.
- Mark and cut your timber battens. Standard 25x50mm timber works for most boxing jobs. Fix battens to the wall and floor with wall plugs and screws, forming a simple ladder frame that the panels will sit on.
- Add support blocks wherever a panel edge or a future screw fixing will land, especially at corners and around any access point.
- Cut panels to size and offer them up dry before fixing anything permanently. This is the point where you catch a measuring mistake, not after the silicone has gone off.
- Fix the panels with pilot holes spaced roughly every 15cm along each batten, following the step-by-step approach Wickes outlines for domestic pipe boxing.
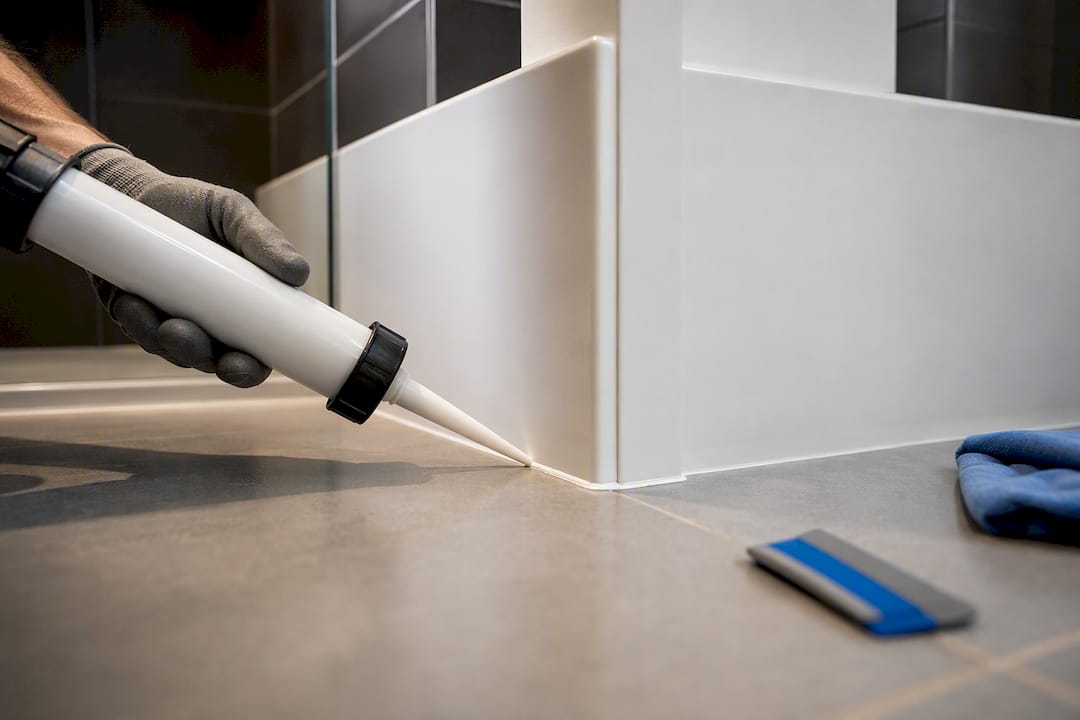
- Seal every edge with silicone where panel meets wall, floor, or another panel. This is the single most common failure point in DIY boxing.
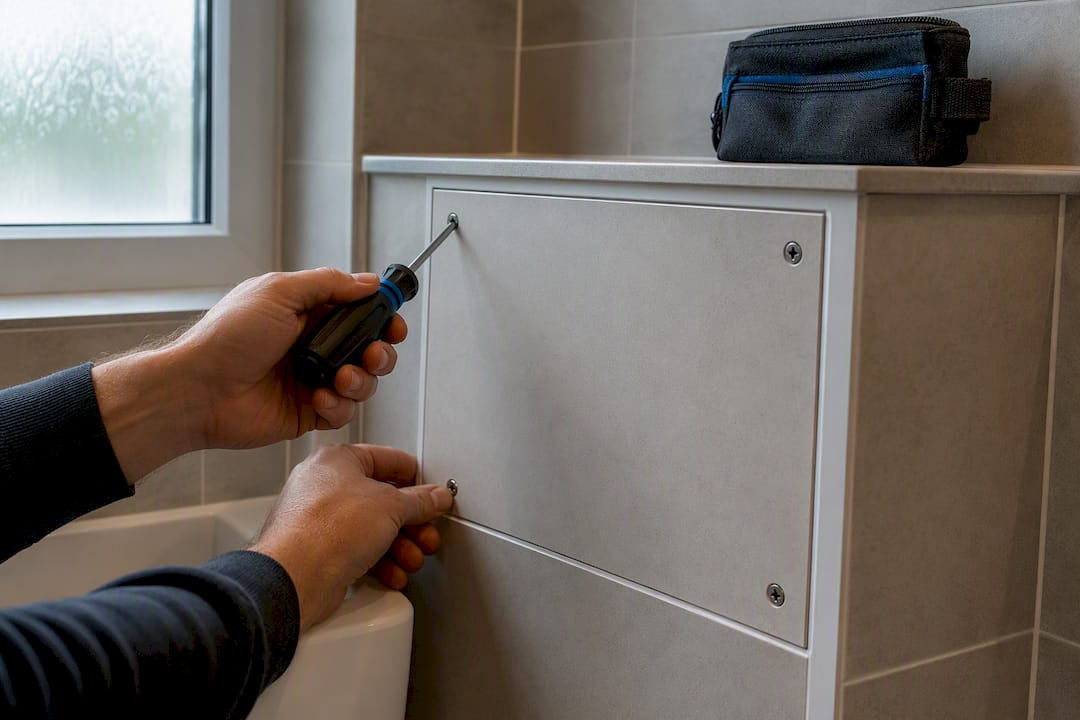
- Build in access. A removable screwed panel or a small hinged hatch over the trickiest joint (usually a valve or a union) saves you cutting the whole box open later.
- Test fit before finishing. Screw the access panel in and out a few times. If it’s stiff now, it’ll be worse once tiled or painted.
If you’re tiling, switch your panel material to Marmox or another cement board rather than MDF, use a flexible tile adhesive rated for boards, and finish joints with silicone rather than rigid grout, which cracks under movement.
Vertical stacks need a bit more thought. Leave a small ventilation gap or an inspection point near any join, and if the stack is a soil or waste pipe rather than just water supply, get a plumber to check it before you box it in permanently.
Pro Tip: Screw, don’t glue, your access panel. A panel held with four screws costs you two minutes to remove during a future repair. A glued or heavily siliconed panel means cutting out and rebuilding the whole thing.
Which Boxing Material Is Right for Your Bathroom?
The material you choose determines how long the box lasts and what you can finish it with.
- MR MDF and plywood are the cheapest options and easy to cut with standard tools, but every edge needs sealing. Left unsealed, standard MDF absorbs moisture, swells, and encourages mold, which is why manufacturer advice consistently points toward moisture-resistant boards rather than the untreated version sold for general joinery.
- Marmox and other cement/tile-backer boards are fully waterproof and the only sensible substrate if you’re tiling over the boxing, particularly in a wet zone like a shower enclosure.
- PVC panels wipe clean, never corrode, and suit renters who want a tidy finish without committing to tile. The trade-off is a more utilitarian look and different fixing method (usually clips rather than screws through the face).
For low-level skirting boxes around a bath, MR MDF with painted trim usually does the job. For anything inside a tiled wet zone, cement board is the only material that won’t eventually let you down.
Access and Maintenance: Don’t Box Yourself Into a Corner
The whole point of boxing pipework properly is that you can still get at it. A box you have to smash apart to fix a drip isn’t boxing in. It’s burying.
- Screwed removable panels are the simplest access solution and work well on flat, unobtrusive sections of boxing.
- Hinged hatches suit spots you’ll open often, like beside a shut-off valve.
- Push-catch or magnetic panels give the cleanest look but can work loose over time and aren’t ideal over anything load-bearing.
When you do open a panel, check for water staining, green or white corrosion on copper or brass fittings, condensation on cold pipes, and whether insulation has slumped or gone damp. Wickes notes that a panel designed to unscrew rather than glue over a joint saves real money if a leak develops later. Never permanently seal over a valve, union, or soil stack joint. If you’re boxing a waste stack rather than a simple water supply run, get a plumber’s opinion first.
Safety, Moisture, and the Water Hammer Problem Boxing Won’t Fix
Moisture is the reason most DIY pipe boxing fails within a couple of years. Water gets behind an unsealed edge, the board swells, and the whole panel warps or grows mold. Silicone every joint where the box meets floor tiles, wall tiles, or another panel, and don’t skip it because it looks fine dry.
Sound is the other issue people forget until it’s too late. Packing the void with acoustic mineral wool and wrapping the pipe itself cuts down on both flow noise and vibration knocking against the boxing.
Here’s the one people get wrong constantly: boxing in a noisy pipe does not fix water hammer. It just muffles it. Viessmann’s technical guidance is direct on this point: fix loose pipes with proper clips or fit a water hammer arrestor before you box anything in, because sealing a mechanical fault inside a panel just traps the problem where you can’t get at it easily. If you’re dealing with banging pipes, sort it using a water hammer fix first. Stop and call a plumber if you find an active leak, heavily corroded fittings, or a soil stack that needs rerouting. None of that is a weekend job.
What Does It Cost to Box in Bathroom Pipes?
A basic painted MR MDF box around a simple horizontal run typically costs the least. Board, timber battens, screws, and silicone for a small job come in well under £100 in materials if you’re doing the work yourself. Where the price climbs is tiling: cement board, adhesive, grout, and matching tiles add up fast, and small UK boxing projects commonly land between roughly £200 and £500 once tiling or a tradesperson is involved.
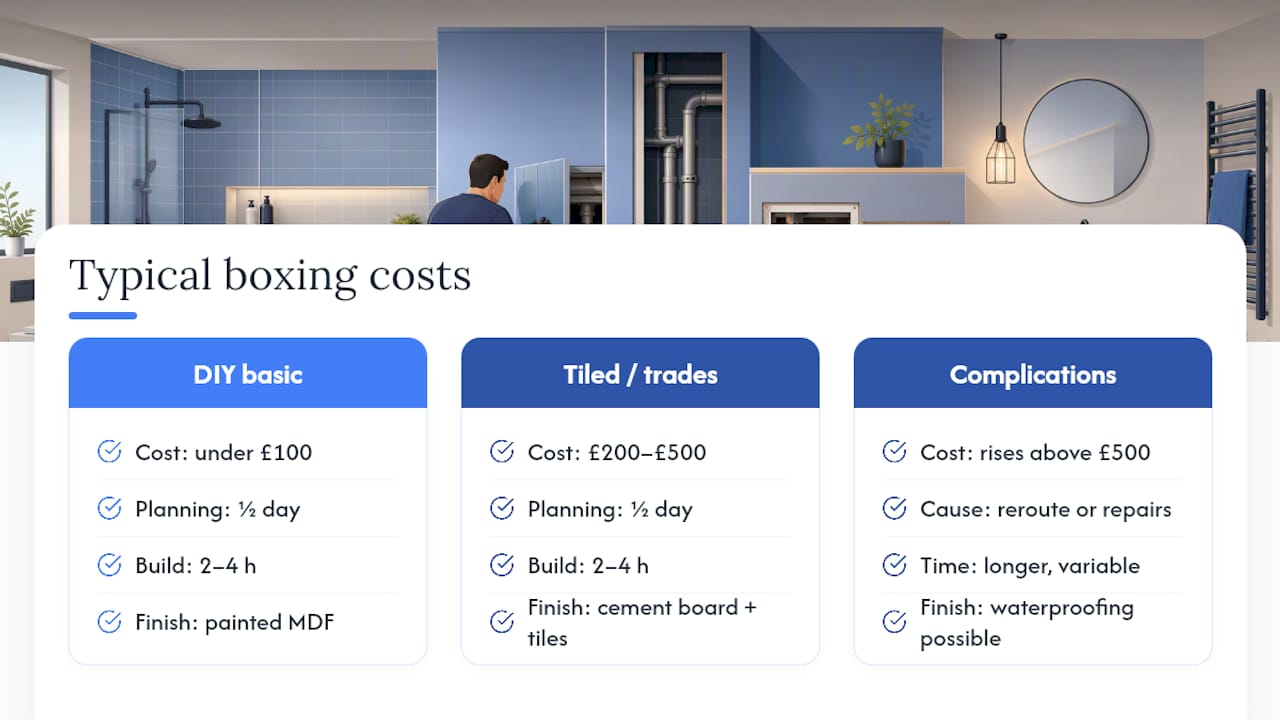
On time, budget half a day for planning and measuring, then 2 to 4 hours for the actual build on a straightforward single box. Tiled finishes need extra drying time between adhesive and grouting, often overnight. Costs and time both jump if the job uncovers something beyond cosmetic: rerouting pipework, waterproofing a full wet zone, or replacing corroded sections you didn’t know were there until you opened the wall.
Finishing Touches That Make Boxing Look Built-In
The difference between a box that looks bolted on and one that looks designed in usually comes down to the finish, not the frame underneath.
- Tiling over Marmox or cement board needs a flexible tile adhesive, standard grout, and a silicone bead at every internal corner rather than rigid grout, which will crack.
- Painting MR MDF works well with a bathroom-grade paint and a primed, fully sealed edge. Add a simple timber trim to hide the join between board and wall.
- Low boxing around a bath can double as a shelf or small storage ledge, turning dead space into practical bathroom storage rather than a plain panel.
- Match your skirting profile and leave a small shadow gap where the box meets the floor for a cleaner, more deliberate look.
- If you need an access hatch on a visible face, look at humid-room door and panel materials the way you’d choose bathroom door materials built to handle steam and moisture without warping.
When to DIY and When to Call a Plumber
Simple cosmetic boxing around a straightforward horizontal or vertical run is a fair weekend project for anyone comfortable with basic carpentry. The moment you find a leak, a corroded joint, or a soil stack that needs moving, stop and get a professional in. A proper survey identifies pipework that actually needs repairing or resupporting, checks waste stack condition, and specifies the right waterproof substrate before anything gets sealed behind a panel.
— James
Let JM Plumbing Services Handle Your Pipe Boxing and Bathroom Finish
If the idea of cutting board, chasing a square wall, and hoping the silicone holds isn’t how you want to spend a weekend, A professional service offers an alternative for homeowners who want one team to handle pipe boxing, fix any underlying plumbing faults first, and complete the tiling or paintwork in the same visit rather than coordinating multiple contractors.

A typical visit starts with a survey to check for leaks, secure any loose pipework, and confirm the right moisture-resistant substrate for your bathroom before a single panel goes up. From there you get a clear quote covering materials, boxing, and finishing, whether that’s a simple painted box or a fully tiled wet zone. If you’re in Cardiff, Penarth, Cowbridge, Rhoose, or the surrounding area, get in touch through the Cardiff bathroom installation page to book a survey and get a firm quote for your pipe boxing and bathroom finish.
Key Manufacturer and Trade Resources
- Viessmann: moisture guidance and mechanical fixes like water hammer
- Wickes: step-by-step framing and access panel installation
- Screwfix: tools, safety, and vertical pipe considerations
- Marmox: waterproof tile-backer specifications for wet areas
Sources
- How to box in pipes in the bathroom | Viessmann
- How to box in pipes | Wickes
- Boxing in pipes | Screwfix
FAQ
Is It Possible to Box in Water Pipes in a Bathroom?
Yes. Boxing in water pipes is standard practice as long as you use a moisture-resistant board, seal every edge, and build in a removable panel over any valve or joint.
What Is the Best Material for Boxing In Bathroom Pipework?
MR MDF or plywood works for painted finishes, but cement board like Marmox is the better choice under tile because it’s fully waterproof and won’t fail in a wet zone.
How Much Does It Cost to Box In Pipes?
A basic painted box can cost under £100 in materials for a DIY job, while tiled or trades person-involved projects typically run between £200 and £500 depending on size and finish.
How Do You Get Rid of Water Hammer in Pipes?
Boxing in a pipe won’t stop water hammer. You need to secure loose pipework with proper clips or fit a water hammer arrestor before sealing anything behind a panel.